


New to brewing? Leverage your beverage with Zest…
Brew Maps
Brew-dimentary directions for future coffee geeks.
Just recently I was approached by one of our customers. Almost embarrassed to ask a “silly question”, that she “didn’t know who else to ask”, she swallowed her pride and asked,
“Umm, how should I grind my beans?”
Little did she know that with one apparent ‘silly question’ she was making the rewarding jump from coffee drinker to coffee lover.
I was reminded how many coffee drinkers out there have the potential to get more out of their experience if only they were privy to some ‘basics’.
Have ever you found yourself mumbling this over a cuppa?
I want to home brew but I don’t know where to start.
The coffee experts intrigue me… but what are they talking about?
I can’t ask my barista what ‘origin’ means, how embarrassing.
To you, the ‘real coffee people’ are a delicate blend of intense, confusing, and let’s be honest, little bit over the top from where you’re standing – but still, you desperately want to be a part of it – don’t you?
And so you should, it is a wonderful thing to be a part of. Coffee knowledge expands into so many areas, and every component that you can deepen your knowledge in, will improve your cuppa. Mark my words.
So let’s get on the road, shall we?
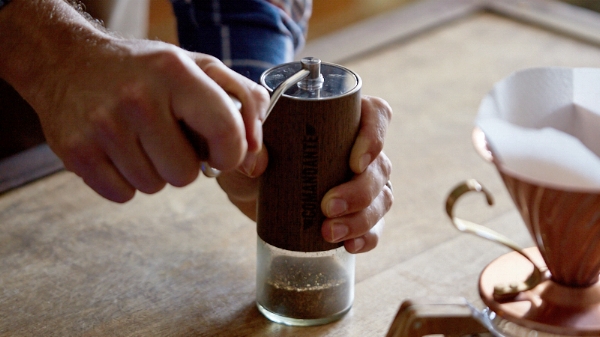
Grinding using the Comadante Hand Grinder.
Map 1: Grinding your own beans.
You can’t just boil a whole bean in a pot of water and hope every nuance is released, producing the cup you expect – in fact that would be a waste of time and water, and really, oxygen.
But grind those beans, and grind them properly, and you will launch yourself on the road to a brew-tiful journey.
Because a cup of coffee is the end game, but in the journey is the true joy.
1. Know your destination.
What road are you traveling on? Espresso or Filter?
This is a must know. Beans are roasted with a brew method in mind. Check on the pack or ask your retailer if the beans have been roasted for espresso or filter coffee.
Why? Because, in short;
Espresso beans are roasted a little hotter and longer than filter, the ‘darker roast’ brings out the ‘spro’s famous big bodied flavour and that crema we all look for.
Filter uses a lower final temperature and a shorter period of time, resulting in a less ‘roasty’ flavour with more subtleties. The lighter roast produces a sweeter cup…however, use a filter roast in an espresso machine and – ooh, no, don’t – you will get a very sour cup. We don’t want that.
Not sure which is which?
Espresso:
Stovetop, Espresso machine, Turkish coffee
Filter:
Aeropress, Chemex, percolator, Moccamaster, Pourover, French press
Stop, listen: If you like, you can use a lighter espresso roast with an Aeropress or even a French Press, depending on your taste BUT, the same doesn’t apply using a filter roast with an espresso machine or stovetop.
2. Choose your vehicle.
Discovering what to look for in your grind – and having the confidence to do it yourself – is an easy path to ripening your coffee experience.
Think about it, it’s almost primal…take a piece of roasted ‘fruit’, crush it to a powder and brew, and then, coffee. But you do need a vehicle to get you there because you cannot do it with your hands – it’s not quite that primal.
So many grinders on the market, for novice home brewers though, we’d recommend a manual hand grinder to begin, it will help develop that primal quality of knowing your grind.
Maybe begin with a simple Rhinowares Hand Grinder.
And here, this is handy…
Check out this little Youtube tutorial, just to show you how simple it is.
We took our trusty Rhinowares Hand Grinder and the Aeropress so we wouldn’t be without coffee as we walked the streets of Milan. 😉
3. Day-tripper: grind fresh daily.
A vital key to the best brewing is to grind your coffee fresh. Every day.
So, you may have to set your alarm a few minutes earlier in the morning, it is worth it, trust me. Freshly ground coffee will bring out all the best qualities of your brew. A brew that has passed through many hands to get to your bag of roasted Zest beans. Respect the brew and it will give you back.
Start to think of your morning cup as an experience, rather than a chore. This slight change in attitude is also going to allow you to love your coffee even more.
Stop, listen: Also, the fresher the roast, obviously the better. Prime brewing is somewhere between 7 and 14 days after the roast date, sometimes a roast will keep it’s flavour up to 4 weeks, but if in doubt, ask us!
4. You’re at the crossroads, which grind do you take?
Now you are ready to grind your own, ready take the plunge…or the drip or the espresso…hang on, which one for which?!
Grind and brew technique can be best mates or morbid enemies.
Each different brewing method calls for a slightly different sized particle to bring out optimal flavour. Using the wrong grind for a particular brewing technique can – I hate to be drastic, but – kill your coffee.
So what are the grind sizes and for what brew is what?
Lemme break this down into a basic ‘general’ rule of 4…there are many minor variables in every method/roast that can have an impact on the final product, we will explore this later, but let’s just keep it basic for now.
(i) The famous 4, and everything in between.
Recognising 4 basic grinds is a good foundation to raise your brewing confidence, from here you should be able to decipher the others:
Coarse
Crunchy, large particles, the size of Milo, sea salt or dare I say instant coffee
Medium
Similar to the texture of sand
Fine
Imagine table salt, a little bit finer,smooth between your fingers
Superfine/Turkish coffee
Almost powder
(ii) Brewing methods and their best (mate) grind.
To get you started, some of the most popular for home brewers and the grind required to optimise each below:
Pods. No, don’t. Never. Next.
Cold Brew Coarse
French Press (press or plunger) Coarse/medium
Percolator Coarse
Chemex & Aeropress Medium
Pourover Medium/fine
Stovetop espresso/Moka Fine
Espresso machine Fine
Turkish coffee maker Superfine
4. Hands on the wheel.
Depending on the grinder you are using, the 4 grinds above are fairly easy to reach and you should be able to work out the various other grinds according to the look and feel of the coffee grains. (Yes, get in there, fingers on beans!)
Integral to the process is allowing yourself to get your hands dirty. Feel the coffee, smell the coffee, roll it around in your fingers.
Speaking of hands, here is a great little clip showing you some basics of hand grinding.
6. Anything else I should know, some cool and essential tips maybe?
Trouble-shooting your grind size can be a frustrating and/or fulfilling venture – and a great skill to acquire. However you see it, it is good to know what you looking for (or tasting for, more to the point) so you know which way to move.
Here is a great little article to look at on grind size and its value to your brew.
Grind determines extraction time. Some brewing methods require a longer extraction time and some shorter. Again, there are so many variables to reach the perfect brewing time, but you should be able to tweak it a little either side by just adjusting your grind (for now).
Stop, listen: Here is a simple rule, if your coffee tastes a little sour or acidic you have probably under-extracted (your grains are too coarse) And if your coffee tastes bitter and tasteless, you may have over-extracted (too fine).
You want to be able to ‘taste’ the coffee – especially Zest, because there is so much flavour!
Look at you, now you’re cruising…
So now you should be on your way, ready to confidently grind your own beans and begin the home brewing journey. This is only the beginning, there is so much more to learn and love about coffee, but at least you’re on the road now.
Happy travels; now grab yourself a fresh Zest roast and cruise your brew!
Any questions, silly or not, post in the comments or contact us at Zest HQ, we’d love to hear from you!
Now enjoy that brew!